To Moor Stern on the Quay – Med Mooring Copy
Now let’s talk about mooring using anchors or, as it is also named, a “Med-Mooring”. This system is mainly used for Ro-Ro ships, Ferries and ships that need long stops – for example, decommissioned vessels – occupying the least possible space on the quay.
Let’s not confuse this manoeuvre with the V-configuration! Helpful in the open sea, in canals and rivers where it is necessary to limit the range of rotation, as we saw in the previous chapter.
Let’s Start from the End
How many shackles will we give for safe mooring? The answer is: it depends. The variables are many, but we can simplify them into two opposites:
- Weather conditions.
- Stopping time.
If the stop is very short – only for a few hours, and there are typical summer conditions of high pressure and fair weather condition, we can afford to drop out an amount equal to three times the seabed depth and, in any case, never less than three shackles in the water.
Suppose the planned stop is very long – for works or decommissioning – with propulsion and steering out of order and reduced personnel. In that case, it is evident that we will use all the available chains we have, also adding, if possible, some cables or wire-ropes at the bow, working across the beam.
Let’s move on to the analysis, step by step, of the reasoning and strategy to be applied. We need to moor a:
- 140-meters long Ro-Ro ship stern to the quay.
- Draft 6 meters fore and 7 meters aft.
- Right-handed fixed pitch propeller.
- 800 horsepower bow thruster and traditional rudder.
- Fairweather conditions.
The expected stop is 24 hours; ample space available, without any particular obstacles.
First, we take note of the type of seabed and its depth. The best conditions include a good-holding seabed – for example, sand or mud – and a depth of around 15 metres. Then we have to identify the points where we would set the two anchors, and do it, as already mentioned above, by surveying or using fixed references on the ground, such as the bollards on the quay. Considering that we are in good weather conditions, we can approach the anchoring points by using a “direct” route or positioning the ship perpendicular to the quay.
- The first case is faster but also less accurate. We will use it when we have excellent references for the set of anchors. Let’s see in detail:
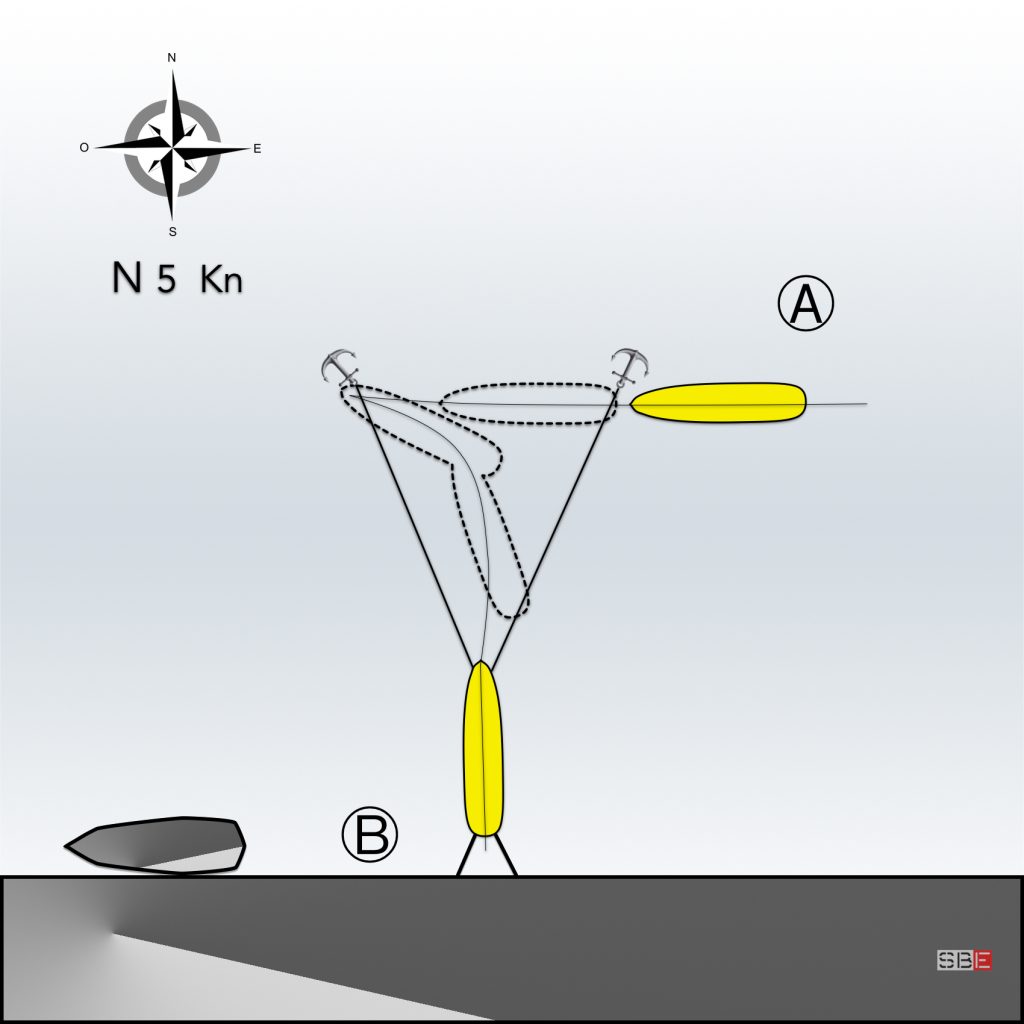
We will approach the point where we will drop the starboard anchor with a parallel course to the berth and a speed between two and three knots. We’ll slack the chain until we reach the point where we will let go of the port one. We’ll proceed sternway holding the starboard cable. When the ship stops, we’ll go far to port. The grabbed starboard anchor and the right-handed effect of the propeller will facilitate rotation, while the engine always astern will make us start to retreat. In this phase, we will slowly slack the port anchor – not to pile up the chain on the bottom – and we will tighten the starboard one well to settle them.
We will use the bow thruster throughout the operation to help us maintain the desired direction. Once the two chains are settled, we will slack them together in a controlled way, careful not to pile up or dredge on the bottom. If we do the job right, we will find stern-looking slight shifts to starboard concerning the final position. So to have an advantage in controlling the paddle-wheel effect.
Again, we will send the aft stern line ashore from starboard to have a mooring line that helps control the paddle-wheel effect. We will pass the heaving line once close enough to do it. Or we will use the mooring boat. As soon as the line is on the bollard, tacking it and, at the same time, slowly slacking the chains, we will approach the final position. We will send the port stern line. The two mooring lines help to centre the stern to lower the ramp. At the end of the mooring, we will stretch both chains.
- The second case will be helpful when we do not have reference points to exploit to identify the position to set the anchors.

We will approach the quay with a speed of about 4 knots and an approaching angle of about 30 degrees. At the right moment (approximately three hulls from the dock), we will put the rudder hard over to the starboard, and we will use the engine to help us turn first and then stop the vessel. In the first phase, the bow thruster will be hard to starboard. We will stop the engine and the bow thruster when the ship is stationary and perpendicular to the berth.
It will be easier to estimate how far the stern is from the dock in this position. With the residual headway and with the help of the thruster, we will move the bow to the point where we will drop out the starboard anchor. Subsequentially, still using the bow thruster, we will move – slacking the starboard anchor chain – to the point where we will drop the port anchor.
We will proceed as we did in the first case described above, moving astern to the final mooring position.
Unmooring with Two Anchors Ahead
In the manoeuvre we describe, we prefer not to indicate a particular wind condition but suggest solutions for different possibilities. The situation is as follows:
- Ro-Ro ship 140 meters long moored stern at the quay with two anchors set.
- Draft 6 meters forward and 7 meters aft.
- Right hand fixed pitch propeller.
- 800 horsepower bow thruster and traditional rudder.
- Five shackles at sea for each anchor.
We first lift the ramp, gear the anchors, and ‘single up’ the mooring by staying on two short stern lines. We heave on the chains, and once we are sufficiently far from the dock, we let go of the remaining stern lines, ‘heaving up’ them quickly on board.
We will not use the engine to avoid the risk of sucking the lines into the propeller at this stage.
When there are three shackles in the water on each side, we stop heaving the one that looks towards the exit direction or, in any case, from the part freest from obstacles. Suppose, for example, that vessel is closer to a dock with its starboard side; we stop heaving the port anchor and continue with the starboard one. When the starboard anchor aweigh, we resume heaving the port. The latter, during the operation, takes us away from the starboard quay and brings the bow in the desired direction.
In case of wind, from any direction, we secure the tugboat to the windward side; it serves to keep the stern upwind. Then we engage the anchors, raise the ship’s ramp and lighten the mooring keeping two lines on the windward side and one from downwind. We heave on both chains slacking the stern lines in a controlled manner as we move away from the dock. When the tug has enough room to work, we let go of the leeward line first and then the others. We keep weighing anchors till three shackles on both sides. Meanwhile, the tug works to keep the stern under control.
We proceed then, as described in the previous example. The engine and the bow thruster may help facilitate the anchors’ hauling throughout the operation.
